I had a lovely morning with my littlies today. After their sister was taken to school, and on our way to the playground, we ventured out to the Bourke Street Bakery in the name of research :-) We tried the lentil pastry, chocolate croissant and rhubarb danish and they were all delicious. And with afternoon tea and dinner in mind we brought home a soy and linseed loaf and a plain sourdough loaf
I've written about my love of breadmaking in the past, but each summer I go off it for a while, not being able to stand heating up our already steamy kitchen with the high temperatures required to bake bread.
But lately I've enjoyed a couple of handmade sourdoughs, and then yesterday a friend dropped by with a new starter for me (after I killed the last one with neglect - oops!).
It made me go straight to the present I was given by friends for my 40th birthday last year - this cookbook by the Bourke Street Bakery. It's a beautifully designed and photographed book, but I must admit to having been a bit intimidated by it in the past. It's very professional and extremely thorough in the explanations of bread making, but with kids screaming at my ankles around dinner time it's more than I felt I could cope with!
Now that I have my starter though I'm keen to tackle one of the breads, maybe the potato and rosemary which looks divine.
Another thing I would love to get the courage up to try are the chocolate croissants... partly because it looks like a good challenge, but of course partly because I'd like to eat them. Lots of them ;-)
Showing posts with label bread. Show all posts
Tuesday, March 20, 2012
Monday, May 23, 2011
Quick morning cheese & olive rolls
One night last week I went out with some girlfriends for a few birthday drinks, which was a few more than I am used to these days! We had a great time, lots of laughing and stories, perfect!
In the morning I was craving something savoury to eat and also needed something to give my big girl for her 'little lunch' at school. I knew I had some '5 minute dough' in the fridge but didn't feel like cinnamon or vegemite, so scouted around and found a jar of kalamata olives and decided to try making olive & cheese rolls. Here's what I did in case you'd like to try them:
Set the oven to 220c with oven shelf at the top and pizza stone in if you have one.
Using the basic recipe (I'd substituted 1 cup of plain flour for wholemeal to add a bit of texture and goodness), pull out a lump of dough from the fridge. Pull and stretch it (or you can use a rolling pin if you prefer) into a rough rectangle (I did about 30 x 20cm) and let it rest til it comes to room temperature or at least for a while.
Sprinkle liberally with tasty cheese and then scatter with deseeded olives.
Start rolling up from the long side, lifting and being careful not to push the filling out as you go.
Once it's all rolled, cut into about 3cm lengths with a serrated knife.
Place them cut side up onto some baking paper. Slide onto your pizza stone (or place onto a tray and put tray into the oven) and cook for about 10 minutes or until puffed up and starting to brown.
Highly recommended for a slightly sore head or for school snacks ;-)
Tuesday, April 26, 2011
Easter long weekend
Hi, how was your Easter weekend? Ours was spent having a bit of a break from technology (for me at least) and enjoying some family time (when we weren't having tantrums that is - hey, that's a 3 year-old's job, isn't it?!).
We did some of our favourite things:
Went for walks...

built sand castles...

spent ages throwing pebbles into the water...

looked for crabs and other creatures...

and made and ate hot cross buns... (I used the trusty no-knead method and added sugar, spices, sultanas and some choc chips - thank goodness for something edible after my recent pumpkin failure ;-)

Not to mention celebrating my mum's birthday (Happy Birthday mum!), hunting for Easter eggs then negotiating the eating (or not) of those eggs, lazing around in the new pyjamas and plenty of wrestling with uncles and cousins - the kids that is, not me ;-)
I hope you had time to relax and recharge the batteries! What did you get up to?
We did some of our favourite things:
Went for walks...

built sand castles...
spent ages throwing pebbles into the water...
looked for crabs and other creatures...
and made and ate hot cross buns... (I used the trusty no-knead method and added sugar, spices, sultanas and some choc chips - thank goodness for something edible after my recent pumpkin failure ;-)

Not to mention celebrating my mum's birthday (Happy Birthday mum!), hunting for Easter eggs then negotiating the eating (or not) of those eggs, lazing around in the new pyjamas and plenty of wrestling with uncles and cousins - the kids that is, not me ;-)
I hope you had time to relax and recharge the batteries! What did you get up to?
Saturday, February 26, 2011
Weekend cooking - english muffins
The weekend's a time when I sometimes get the opportunity to cook something different or fun, a change from the quick and easy routine of weeknights. Come and see what I've been up to this weekend...

My big girl is a difficult one to cook breakfast for. As in every family household, weekday mornings are all rush rush, toast, cereal etc, but one of the mornings on the weekends I like to cook something a bit more substantial if we have time.
However, as she is allergic to eggs (sorry big girl, must be bad genes ;-) that rules out a heap of things I like, and enjoy cooking. Like scrambled eggs with pesto, poached eggs, and fried eggs with dahl and flatbread.

She also doesn't like mushrooms or tomatoes and I won't cook bacon (sorry again - bad luck having a vegetarian mama ;-) And although she'll occasionally ask for pancakes - egg-free recipe here - like me she really is a savoury girl in the mornings... vegemite on toast anyone?
And so I am always looking for other things I can cook that she'll enjoy. I suddenly thought about English Muffins the other day and found this recipe which stated that it had been used by someone for 29 years! That's got to count for something, right?

I did a bit of experimenting with the ingredients, and they were a bit of a novelty to cook: a bread dough but cooked in a frying pan on the stove, a bit like crumpets. Next time I might try some wholemeal flour and maybe make a half batch - though they supposedly stay fresh for a couple of days they really were best still warm with some butter and cheese thrown on.
The Mr obligingly cooked some bacon for all but me and afterwards the big girl commented on how full her tummy felt, which was music to my ears :-) I had a nice poached egg with mine, though my energy and inclination didn't spread to hollandaise sauce and spinach unfortunatley!

Not particularly photogenic, the old muffins. But then I guess as they say, "A good tradesman never blames his tools"!
My big girl is a difficult one to cook breakfast for. As in every family household, weekday mornings are all rush rush, toast, cereal etc, but one of the mornings on the weekends I like to cook something a bit more substantial if we have time.
However, as she is allergic to eggs (sorry big girl, must be bad genes ;-) that rules out a heap of things I like, and enjoy cooking. Like scrambled eggs with pesto, poached eggs, and fried eggs with dahl and flatbread.
She also doesn't like mushrooms or tomatoes and I won't cook bacon (sorry again - bad luck having a vegetarian mama ;-) And although she'll occasionally ask for pancakes - egg-free recipe here - like me she really is a savoury girl in the mornings... vegemite on toast anyone?
And so I am always looking for other things I can cook that she'll enjoy. I suddenly thought about English Muffins the other day and found this recipe which stated that it had been used by someone for 29 years! That's got to count for something, right?
I did a bit of experimenting with the ingredients, and they were a bit of a novelty to cook: a bread dough but cooked in a frying pan on the stove, a bit like crumpets. Next time I might try some wholemeal flour and maybe make a half batch - though they supposedly stay fresh for a couple of days they really were best still warm with some butter and cheese thrown on.
The Mr obligingly cooked some bacon for all but me and afterwards the big girl commented on how full her tummy felt, which was music to my ears :-) I had a nice poached egg with mine, though my energy and inclination didn't spread to hollandaise sauce and spinach unfortunatley!
Not particularly photogenic, the old muffins. But then I guess as they say, "A good tradesman never blames his tools"!
Thursday, October 21, 2010
Bread of the week - potato focaccia
I've loved potato pizza since the Mr and I visited Rome way back in about 1996. Eating a big slice of it (which was sold by weight, as the pizza bars there do) along with some marinated artichokes, standing on the street, is one of my strongest memories of Rome. All that history and culture and it's the food I remember the most!
Whenever we make pizza at home I make a potato one, sprinkled with fresh rosemary and salt flakes. This is a heartier version of that, as it has a much thicker base and more potato on top than I'd put on the pizza (the pizza gets too weighed down with too much topping).
I didn't photograph the process, but it's pretty simple:
Start by taking out about a third of your container of dough*. Using heavily floured hands, shape it and pull into about a 30cm diametre round, placing on your baking paper. It should be around 1cm thick. Let it sit until it comes back to room temperature. This is really important as you want it to have as much air and lift as possible, otherwise it will be heavy and doughy and just not great!
Meanwhile, slice 2 large potatoes (I used washed ones and didn't peel them) as thinly as possible so you end up with large thin rounds. Then either steam or microwave until just tender.
When the dough is back to room temperature drizzle it with extra virgin olive oil. Then add a layer of potato, sprinkle on some fresh rosemary and sea salt flakes. Add more layers until you have used up all of the potato. Finish with the rosemary and sea salt and another drizzle of olive oil.
Put into the oven on the top shelf on a pizza stone if you have one (see my transfer method in this post). Bake at 220c for around 20/30 minutes. Have a look at the edges of the dough and when it is nicely brown you'll know it's done. Leave to cool a bit then cut into squares. I served this with baked stuffed capsicums (peppers), and I think it would be nice with any sort of braise or stew. Enjoy!
* basic recipe listed on this post
Wednesday, July 28, 2010
Cooking obsession - bread
Last winter I stumbled upon the famous no-knead bread recipe printed in the New York Times that caused a sensation amongst bakers a few years ago. I loved the bread. It has an open chewy texture and a crunchy crust. And when I found this parmesan olive variation I thought they were all the bread recipes I needed.
Then a friend gave me a sourdough starter and I incorporated that into the no-knead recipe, added all sorts of seeds and enjoyed that for a while, the flavour was lovely.
But while the no-knead recipe was great, next came the super easy, versatile Artisan bread in 5 minutes a day recipe and this has become my staple recipe. The book's on my list to buy, I'm sure the variations would be interesting. If you haven't heard of it, it's basically a dough that you mix in a large container (no kneading again) and keep in the fridge for up to 2 weeks. When you want some bread you pull out a piece of dough and bake it. That's it! It's so versatile and useful. It takes very little pre-planning, uses very simple ingredients, is quick and tasty.
So I thought I'd show you how I make the basic bread and over time post pics of all the different things I make with it, and possibly inspire you to try it. Maybe I'll do a regular 'bread of the week' post, or something like that - yes, you can call me a bread nerd, I'll happily accept that ;-)
Here's the basic recipe:
Simple ingredients and utensils
This is the quantity I do that fits my container (a 4 litre Decor plastic rectangular tub with lid) and modify the ingredients ratio slightly to the original recipe so that it's a bit wetter.
Mix in a plastic container (one that has a lid) til combined:
4 cups plain flour
1 tablespoon yeast (I like Lowan brand)
1 tablespoon salt
Then stir in 2 cups of warm water til thoroughly mixed so that there are no more dry patches of flour. The mix will look like the pic above and be quite sticky, wetter than a usual kneaded dough mix.
Place the lid on loosely (so air can still escape) and let it sit on the bench top for around 2-3 hours for the yeast to start to activate. The time here is variable depending on how cold or warm your house is and how warm the water was you stirred in. You don't have to be too accurate though, you'll know it's ready when it flattens out in the container as in the pic above. Now put it in the fridge and use it whenever you like. You can actually use it before refrigerating it, the dough's just a lot easier to handle when it's cold.
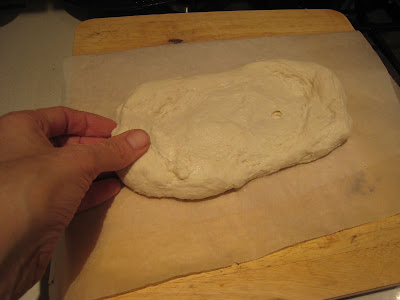
When you want to bake some, sprinkle some flour on the surface and also your hands (it will be sticky), pull up some of the dough and break it off. You don't want to handle it too much as it's so sticky, so try to be quick.
DON'T knead it, but form it into a ball by pulling it and tucking the edges underneath (there's a video here if you want to have a look). Then shape it into whatever you like (in this case a small ciabatta disk shape). Place onto a piece of baking paper (or a floured tray) and let it come to room temperature (or at least a little while if you can't wait).
Then slide it onto a pizza stone* paper and all (see pic below), into a hot oven of about 220c on the top shelf and cook til it looks nice and brown on top (the original recipe says put it into a cold oven, either way seems to work, it's just quicker with oven already heated). Times vary for what you're cooking - this one was about 15 minutes in my oven. Let it cool at least to warm, so that the cooking process continues, then you're ready to cut it! (finished pic at top of post)
Phew, if you're still with me after this marathon post, that's it. I'll start posting my nerdy obsessive variations from next week, happy baking!
* I was skeptical of stones at first (thought them maybe another unnecessary gadget to clutter my kitchen) til my mum gave me one and then my friend Crafty Deb told me how much she liked using hers. They're available in lots of shops these days and are pretty inexpensive, and as Crafty Deb says, you can just keep it in the cupboard with your baking trays so it doesn't take up too much space (or just leave it in the oven if you're lazy like me). They give a nice even dry heat and can be used for all sorts of breads and baking.
Subscribe to:
Posts (Atom)