Last winter I stumbled upon the famous no-knead bread recipe printed in the New York Times that caused a sensation amongst bakers a few years ago. I loved the bread. It has an open chewy texture and a crunchy crust. And when I found this parmesan olive variation I thought they were all the bread recipes I needed.
Then a friend gave me a sourdough starter and I incorporated that into the no-knead recipe, added all sorts of seeds and enjoyed that for a while, the flavour was lovely.
But while the no-knead recipe was great, next came the super easy, versatile Artisan bread in 5 minutes a day recipe and this has become my staple recipe. The book's on my list to buy, I'm sure the variations would be interesting. If you haven't heard of it, it's basically a dough that you mix in a large container (no kneading again) and keep in the fridge for up to 2 weeks. When you want some bread you pull out a piece of dough and bake it. That's it! It's so versatile and useful. It takes very little pre-planning, uses very simple ingredients, is quick and tasty.
So I thought I'd show you how I make the basic bread and over time post pics of all the different things I make with it, and possibly inspire you to try it. Maybe I'll do a regular 'bread of the week' post, or something like that - yes, you can call me a bread nerd, I'll happily accept that ;-)
Here's the basic recipe:

Simple ingredients and utensils
This is the quantity I do that fits my container (a 4 litre Decor plastic rectangular tub with lid) and modify the ingredients ratio slightly to the original recipe so that it's a bit wetter.

Mix in a plastic container (one that has a lid) til combined:
4 cups plain flour
1 tablespoon yeast (I like Lowan brand)
1 tablespoon salt

Then stir in 2 cups of warm water til thoroughly mixed so that there are no more dry patches of flour. The mix will look like the pic above and be quite sticky, wetter than a usual kneaded dough mix.

Place the lid on loosely (so air can still escape) and let it sit on the bench top for around 2-3 hours for the yeast to start to activate. The time here is variable depending on how cold or warm your house is and how warm the water was you stirred in. You don't have to be too accurate though, you'll know it's ready when it flattens out in the container as in the pic above. Now put it in the fridge and use it whenever you like. You can actually use it before refrigerating it, the dough's just a lot easier to handle when it's cold.

When you want to bake some, sprinkle some flour on the surface and also your hands (it will be sticky), pull up some of the dough and break it off. You don't want to handle it too much as it's so sticky, so try to be quick.
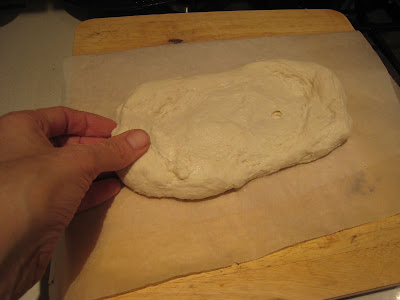
DON'T knead it, but form it into a ball by pulling it and tucking the edges underneath (there's a video here if you want to have a look). Then shape it into whatever you like (in this case a small ciabatta disk shape). Place onto a piece of baking paper (or a floured tray) and let it come to room temperature (or at least a little while if you can't wait).

Then slide it onto a pizza stone* paper and all (see pic below), into a hot oven of about 220c on the top shelf and cook til it looks nice and brown on top (the original recipe says put it into a cold oven, either way seems to work, it's just quicker with oven already heated). Times vary for what you're cooking - this one was about 15 minutes in my oven. Let it cool at least to warm, so that the cooking process continues, then you're ready to cut it! (finished pic at top of post)

Phew, if you're still with me after this marathon post, that's it. I'll start posting my nerdy obsessive variations from next week, happy baking!
* I was skeptical of stones at first (thought them maybe another unnecessary gadget to clutter my kitchen) til my mum gave me one and then my friend Crafty Deb told me how much she liked using hers. They're available in lots of shops these days and are pretty inexpensive, and as Crafty Deb says, you can just keep it in the cupboard with your baking trays so it doesn't take up too much space (or just leave it in the oven if you're lazy like me). They give a nice even dry heat and can be used for all sorts of breads and baking.


Thank you for posting this! I have been itching to make it myself, but keep forgetting to ask you for the recipe.
ReplyDelete-Chiara x
You're welcome Chiara - let me know how it goes and what you make x
ReplyDeleteNice bread. I leave my stone in the oven too. Whatever I'm cooking goes on top. Looking forward to your variations.
ReplyDeleteThe bread is lovely! Yesterday I made a few plain rolls, but am going to attempt cinnamon scrolls for breakfast/morning tea. Looking forward to your post on variations to the recipe/dough!
ReplyDeletex
Was wondering if you'd tried this type of bread with sourdough and how it went. If so, can you post the recipe? Thanks! Lisa
ReplyDeleteHi Lisa, while I have a sourdough starter that I used I haven't actually used it in this recipe - but I love a challenge so I shall try it and report back!
ReplyDeletehiya, i know this is an old post, but I LOVE IT and am making it now. did you use Plain flour or Bread flour? thanks. cinnamon scrolls are a fav in this house too.
ReplyDeletethanks for your comment jo, i was just mixing the flour and water when your msg pinged into my blog! i have used half plain and half bread and will post any pics! thanks again.
ReplyDelete