Monday, January 31, 2011
On knowing where to draw the creative line... or not
It's an anxious day for this mama today with our little girl having a small operation (day surgery) and our big girl having her first day of Year 1. But more on that tomorrow...
Recently I've made a few presents for friends' birthdays, one of them for a 40th (and I'm joining the club this year too - yikes!). My friend loves clothes and accessories so I wanted to give her something I'd made especially for her. I decided on one of my 'no sew jersey scarves', which I'd been enjoying wearing myself til the weather started to really heat up here.
So I made one in this soft magenta jersey, adding a bit more detail with extra knotting.
Then I decided on a little zip purse to go with it in this lovely cotton print. I lined it in a burgundy cotton, adding a pink zip and a beautiful green and pink ribbon as a zip pull.
* A little tip to stop ribbon fraying is to run a thin line of glue (I used super glue) along the raw edge and let it dry. If you've accidently applied too much or the edge is a bit ragged you can trim the edge once the glue is dry, as long as you don't go beyond the glued area, or it will fray again.
Once the purse was finished I placed it with the scarf and... ARGHH! That horrible feeling hit me where you know you've gone too far. It was too pink, too girly, and altogether too much really.
I had a feeling that probably the scarf and purse would look fine separately, but in order to make it a more stylish gift I went back to my stash and cut a lovely piece of mushroom/chocolate coloured jersey and made a new, simpler version of the scarf. Then I took the bright ribbon off the purse and replaced it with one that toned in with the new scarf. I briefly considered unpicking the whole purse and re-lining it with an oatmeal coloured linen to further tone down the whole thing, but dismissed this due to time constraints (and to keep my sanity!).
On a whim when wrapping the present, I added the pink scarf in. I sheepishly told my friend what happened and, you guessed it, she preferred the pink anyway! Hmm, maybe I should have trusted my instincts first time around!!
Friday, January 28, 2011
This moment
I'm joining Soulemama (and many others) this week with the Friday ritual of 'this moment' - a moment from the week to pause, savour and remember. Happy weekend to you.
Holiday fun... I'll miss it :-)
Thursday, January 27, 2011
My creative space
I'm playing along with Kootoyou's Thursday 'My Creative Space' this week.
Squeezing in a bit of time for something creative whilst the school holidays are still on, I've been playing around with my artichoke prints again. This time I'm offsetting green over white to get different effects, and also printing onto something different for a friend's birthday present - show you next week.
Tuesday, January 25, 2011
One last thing about Christmas...
Yes, I know, I know, it's long gone, but embarrassingly it wasn't until today that I finally took down the stick and packed the decorations away. The stick hasn't gone into the rubbish though, as intended - the girls talked me into keeping it, so now it's stashed away with all the other junk, waiting to be thrown out when I'm not feeling so easily swayed :-)
Speaking of junk, I heard an interview with one of those clutter buster type people on my local ABC radio station the other day and felt really inspired to further cut back on my 'stuff'... until my lovely neighbour with lovely taste who manages a lovely homewares store offered me a lovely new lamp. Damn that non-existent will power! Hmm, the stick must go!
Anyway... when I took the stick down I realised I'd forgotten to finish off my Christmas posts by showing you a couple of beautiful contemporary paper ornaments that were given to us. They joined the others on the stick and have become some of my new favourites.
The first is this amazing Christmas card/ornament that my friend Stephanie posted to us. When I saw her note on the envelope about there being a 'handmade card enclosed' I got excited. Steph puts me to shame with her fantastic handmade cards each year. Considering I didn't even send many cards this year, it doesn't take much (in my defense though, your honour, I claim many late nights making presents as my excuse). This year Steph made beautiful star shaped ornaments out of hand cut stars from pages of thrifted books (in our case children's books). She sewed these together with a little message in the middle. Not to give all her secrets away, she added lovely personal touches that made them outstanding.
And the second is this one from Oxfam, made in Vietnam from coiled recycled paper, and presented on the neck of a bottle of wine. What more could we ask for :-)
So here's to creative friends with fantastic taste!
Sunday, January 23, 2011
New-to-me skirt and avoiding the "to do" pile
With the kids keeping me busy (and tired!) over the school holidays I haven't managed to do any of the sewing for me that I'd had planned. I'm desperate for some new skirts and dresses. But when I looked through a pile of old clothes this morning and found a lovely A-line wrap-a-round skirt that my friend Catrina had given me, I decided it was time for a quick bit of sewing.
The fabric is a soft light/mid weight cotton with a floral pattern that's quite Japanese looking and reminded me of the fabric I bought to make my red dress recently. As soon as I saw the skirt in the pile I knew I wanted to wear it straight away, and when I realised that it was a bit too long I knew that the cut-off hem fabric would be perfect for a soft fabric belt. I've been wanting to make a simple fabric belt that I could wear with jeans for ages but hadn't come across the right fabric... until now.
So there and then I cut the hem off, hemmed the skirt and sewed up the belt - I knew if I didn't do it straight away it would get left in my "to do" pile by my sewing machine and still be there months, maybe years, later!
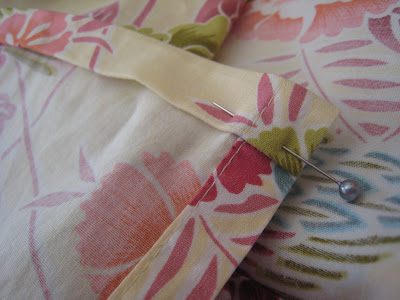
The skirt hem I simply folded up twice, pressed, pinned and stitched.
And for the belt I folded over the raw edge, pressed it, pinned and stitched, folding each end into a curve, as I thought this would look softer hanging down than a square edge.
I can't wait to wear the belt but as we have some hot weather on the way it will have to stay in my wardrobe for now... but at least it's not sitting in that poor old ever growing "to do" pile :-)
Wednesday, January 19, 2011
Sleep shorts for the little boy
I've always put any thoughts of sewing underwear in that mental basket labeled "too hard and why would I bother". Though I know a lot of people do make them. There's a cute kids pattern here, and I remember my mum making underwear years ago.
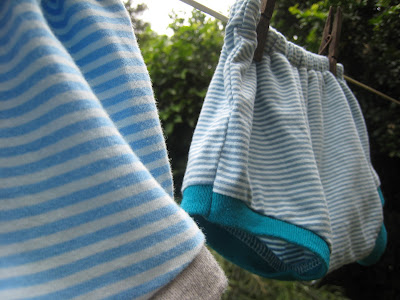
But with the nights being quite warm here at the moment I thought my boy could do with some little sleep shorts to wear over his nappies with a singlet or t-shirt. And they're just like undies really.
I took a good look at a cute pair of short pyjamas he received as a present for Christmas and realised that the pants were just two pieces of fabric sewn together, with leg edges bound in ribbing and an elastic waist. So I took a pattern from them (see the paper pattern below) and simplified them a bit more by just folding ribbing over the leg openings and overlocking (serging) them.
I used some of the $2 per metre knit fabric I bought a while ago to use for my DIY t-shirts, coupled with some scraps of ribbing I bought in a $2 bargain bag from my favourite fabric shop.
One of my thoughts (not resolutions ;-) at the start of the year had been that I should try to tackle fewer sewing projects this year but do them better. The intent was that this would be more satisfying and the garments would be finished better and therefore last longer... so I've failed miserably here with these quickies! But I know he'll outgrow them in the blink of an eye, and it means I can get onto something else sooner... maybe when these school holidays come to an end and life is that little bit less hectic :-)
Saturday, January 15, 2011
Desperately seeking Simplicity 3835
Is the following scenario at all familiar to you?...
• Think about how I'd like a new sewing pattern...
• casually cruise Flickr/sewing sites/blogs for ideas...
• come across something I kinda like...
• see it more and more in some groovy fabrics...
• look it up with the vague idea I might buy it...
• find it's out of print...!
• now desperately gotta have it...!!!
This has happened to me not once but twice lately, and rather than chastise myself about wanting something I can't have and try to except it and move on etc etc, I became more determined to find them.
The first was this Oliver & S very cute kids kimono top pyjama set that I'd started to see everywhere: beautiful versions at Five and Counting and Made by Rae. I finally found it here.
Ahh, satisfaction. Until... I started looking for a dress pattern for me and found the perfect one.. you guessed it: out of print.
It's Simplicity 3835 (this number's in my long-term memory now, and has been Googled umpteen times!), one of the "Built by Wendy" patterns. As usual I don't love the pictures on the pattern cover, but when I looked on my friend Flickr, clever people have made beautiful versions of it. I love the classic peasant top, but mainly it's the tie-sleeved dress that I've fallen in love with - I'm picturing it as a winter staple, layered and worn with tights and boots.
When I did finally find I could actually get it from the US Simplicity site, I speedily went to the checkout only to find that my US$8.95 pattern was going to cost US$26.13 to be posted to me, the total being $35.08! Does anyone know if there are any copies available in Australia?
Maybe I should just give my poor little Paypal account a hiding and pay up, or maybe just accept it and move on... nah, that's not going to happen!
Friday, January 14, 2011
this moment
I'm joining Soulemama (and many others) this week with the Friday ritual of 'this moment' - a moment from the week to pause, savour and remember. Happy weekend to you.
A lizard in the hair of my lizard loving girl!
Tuesday, January 11, 2011
Quilt for my boy
At Christmas time one of the kids' aunts presented us with this lovely quilt she'd made for our little boy. She had previously made one for each of the girls which they've loved playing with, using them for putting dolls to bed, making cubby houses and sleeping under.
I have quilt-envy of my sis-in-law because I am so quilt challenged. I'm scared to start my first one, though I have ideas of what I'd like to do... one day! There's an incredible amount of hand stitching in this lovely quilt that must have taken ages to complete. I'm grateful to have lovely quilts in the house without the stress of trying to make them myself!
When I placed this new quilt on my boy in his cot for the first time I got that lovely feeling you get when you use something that's made with love and care. It made me think that there should be a name for that feeling. Any suggestions? Whatever, it's a lovely feeling and I think reinforces the theory I subscribe to that it's good for the soul to live with things you love.
Monday, January 10, 2011
Egg-free choc chip cookies
We've been making lots of biscuits and baked goodies here over the holidays, but they don't last long between our snacking, play dates and visitors dropping by.
Lately we've made honey jumbles (from the Country Women's Association cookbook), Coconut Sticks (from Lottie+Doof) and today these choc chip cookies. Of course all of them are egg and nut free so that my big girl can eat them. These are a good standby, the golden syrup and brown sugar add a nice caramel-ish flavour and as long as you've got choc chips in the cupboard they should be able to be made without a trip to the supermarket for ingredients, which is sometimes very important for me :-)
Egg-free choc chip cookies
180g butter
125g brown sugar
3 tbsp milk
3 tbsp golden syrup
180g choc chips (white or brown)
250g self raising flour
Cream butter and sugar with electric beaters.
Add milk, golden syrup, choc chips and flour to the bowl and stir til well combined.
Place spoonfuls onto baking paper lined trays and flatten slightly with fingers.
Bake in 180 c oven for about 10 minutes until golden brown and cool on wire racks.
Makes around 30 cookies, depending on your assistants' techniques!
Thursday, January 6, 2011
Oven mitts - back on the gift list
After saying I wasn't going to make oven mitts as Christmas presents as they were fiddly, I decided to anyway and made one pair each for 2 of my sisters-in-law. What I didn't do (but had been part of the plan originally) was to print my artichoke print onto linen and use that to make the mitts. Just a tad too ambitious for my Christmas list!
This first one is made from an Ikea cotton bird print that I thought was a little humorous and might amuse the recipient, sis-in-law A. I had that lovely (though scary!) feeling of anticipation when she commented to me on Christmas morning, while putting her turkey into the oven, that: "I really need new oven mitts!". Little did she know what was inside her present under the tree, hee hee! So obviously watching her surprised face when she opened her present a few hours later was one of the highlights of the present opening :-)
For the outside I used an Ikea cotton print fabric, bound the edge (grr, not fun!) and made a tag with an oatmeal coloured linen, and for a little extra personality I lined them in a bright orange thick cotton.
For sis-in-law B I used "Gunilla" Ikea fabric, which she'd seen on the chair I recovered and commented that she'd liked.
As with the other pair, I did my haphazard machine quilting around whatever shapes I thought would suit it, which was really fun, then bound them again in the linen. I also used that linen for the reverse side of this pair and did some quilting to visually mirror the pattern on the other side.
Aside from the tricky bits again (binding, curves, turning inside out with lots of bulk) I did enjoy making these, not least because I imagined them being used and enjoyed (fingers crossed!).
Tuesday, January 4, 2011
Not burger
Photograph: About.com
Granted, this is may not appeal to you Northern Hemisphere dwellers who are battling snow at the moment. But for all those in sunny climes, can I recommend this mushroom burger as perfect holiday fare?
While staying with family over the Christmas break, my sister-in-laws found this recipe, bought the ingredients and cooked it for me, and it was fantastic. I realised a while ago that as a family we are not so easy to cook for: there's me as a vegetarian (lacto-ovo: eggs & dairy, no seafood) and then my big girl with allergies to eggs and nuts. So that counts out quite a bit. Though, the Mr would eat an old boot if it was presented nicely! Not once over the years have my inlaws whinged at me for being difficult, and that is much appreciated.
So if you feel like something different (or have a vegetarian coming over!) at your next BBQ give this a try. The flavours balance beautifully, it's easy to cook and looks great too. What more could you ask for ;-)
- - - - - - -
Incidentally, this recipe is my staple Christmas day main course. Just thought you'd like to know in case you have a vegetarian coming for dinner next Christmas!
Monday, January 3, 2011
Hand printed tea towels
I totally fell in love with stamping during my Christmas preparations. I stamped everything. If you came to my house and stood still long enough you were in danger of being stamped yourself! After printing some Christmas wrapping paper I suddenly thought of my huge roll of linen and knew it would make great tea towels, trivets, table runners and oven mitts (more on those later). I could design my own little stamps, cut and print them, sew the fabric and voila, Christmas presents!
Well, it didn't quite go like that of course!! For my first design I'd decided on trying an image of an artichoke, one of my favourite foods of all time. The first few stamps I made were awful. The line work was terrible and the design was just all wrong. So I sketched and sketched, thought about it some more, then dragged all 3 kids to art shops til I found a good cutting tool and bought extra supplies of the rubber cutting mats. Then I couldn't find the right colour fabric paint so had to buy several colours to mix, needed to work out how to make a stamp pad for fabric paint, kept getting patchy prints from my stamps, and on and on... you get the picture.
On the verge of giving up, it finally all came together and I ended up with some tea towels I was pretty happy with. Wow, it seems so much effort now I look back on it - I guess every new craft venture is a steep learning curve.
The first tutorial I found invaluable was from the very talented Gennine's art blog, tutorial here. And the second was from the excellent jezzeprints blog. It was invaluable for learning how to make a stamp pad (and for tips about all sorts of detail). You can find her tutorial here. Jesse makes the most beautiful prints. I am in awe.
So here are some of the patterns I made with my beloved artichoke. I did some in white (forgot to photograph) and some in green, and added the red twill tape as a nod to the Christmas season.
My favourite design turned out to be one I came up with in the small hours of the night before we were going away for Christmas (hastily ironed and tumbled dry to fix the ink!). Isn't that always the way, inspiration at the last minute! An artichoke Christmas tree, topped with a white star :-)
And here's one packed up and ready to be posted to a dear friend who I worked with for a number of years who I know will 'get it' :-)
It was fun coming up with the different designs but not really so much fun doing all the printing as it was so laborious and time consuming. The design part of the process was definitely my favourite bit!
There are a few dodgy tea towels lurking around on my sewing table that didn't make it to friends and relatives due to their gross imperfections. I hope to put that frustratingly gathered knowledge to use and overprint some in the hope that I can save them from the scrap heap. Wish me luck!
Sunday, January 2, 2011
New year fun
Hello hello, happy new year! I hope you've had an opportunity to spend some time with your families and relax (although those two don't necessarily go together in my house!) and have some fun.
Around here we have been:
Playing with a new birthday dollhouse happily filled with gorgeous Le Toy Van painted wooden furniture, a Christmas gift...
Cooking and eating plum jam made with these cute little plums collected on a recent foraging trip with friends (thank you Penny :-) ...
making parcels of sweets for neighbours and decorating them using pom poms (great finger tutorial here)...
and finding a little frog under our garbage bins! Very exciting given that we thought we didn't have a 'green' enough environment for them here.
Also I've made a few little changes to my blog. I thought it was about time I changed the pic on my header, then I looked at what a crazy mess my lists on the right had become, and though technically challenged, have tried to simplify it. My aim is to work out how to simplify it further while keeping it easy to navigate. Hmm! And as I've totally ignored my Etsy and Madeit shops lately I've taken them off til I can get some stock back up, which will hopefully happen soon so I can buy more supplies. You know how it goes ;-)
Subscribe to:
Posts (Atom)