This is the dress that I mentioned on last week's creative space, I thought I'd show you how it turned out.
I finally tried the famous 'Schoolhouse Tunic' and enjoyed the experience. I set out to make a 'muslin' to test the size and save my precious black linen til I had it right, but then I ended up quite liking the muslin after I'd done all the little adjustments to it (see notes below if you're interested). I'd made it in a lightweight denim for my stash and had to use something else for the sleeves as the denim ran out, so it was a bit of a hotch potch to say the least.
To tidy it up I finished off the seams then decided to dye it (this beautiful dress being a big inspiration) and do some top stitching, all in an effort to bring it all together and also just as a fun experiment. There's a sense of freedom in working with something that's not precious, I'm sure you'll agree. Here it is above awaiting its dye bath.
The tie-dyeing was fun to do, and turned out reasonably subtle, which I liked. Obviously it would be much better to dye the fabric first and then cut it out to sew, but it's still OK. And the dye overall helped to tie the two different fabrics together.
As for the pattern, I liked it much more than I thought I would and would definitely make it again. I love how the sleeves sit, and they are in a voile type fabric, so I'm thinking a voile version for summer would be nice.
Some pattern notes:
• Size. I always find sizing tricky. I'd looked at lots of Schoolhouse Tunics in the Flickr group and decided I wanted it to be a little more fitted than I think it's intended to be so I cut the size down from the one suggested for my measurements, thinking I could narrow the seams if necessary. But the smaller size was perfect, what a stroke of luck.
• The pleats. The pattern calls for 2 in the front but I thought it looked too 'boxy' on me and tried one instead (and idea from someone in the Flickr group). Much much better. Love the pleat and how it comes off the front opening.
• The sleeves. Love them. Didn't think I would for some reason. I imagined chopping them off or changing them in some way but I found the elastic just adds a little softness to offset the general structured feel of the dress. Will try this on other garments.
And that's about it. The pattern's easy to follow, turns out well and it's an enjoyable sew.
More creative spaces to be seen here.
- - - - -
We've had lots of computer problems in the last couple of days. There's nothing like technical problems to make me feel crazy! I think I've typed this post about 3 times - arghh! Hopefully I will see you back here again in the not too distant future...
Thursday, June 30, 2011
Wednesday, June 29, 2011
Just one more Simplicity 3835
... well, at least until summer! This is the dress that I started back in May and then abandoned in frustration and fatigue. It wasn't working and I couldn't be bothered fixing it. But since I made my boring dress and have enjoyed wearing it, it's spurred me on to finish this one.
You see it was meant to be version B on the pattern - mini dress with sleeve ties, neck band and zip. But when it was almost finished I realised that the neckline looked awful on me and that's where I left the dress, til I came back recently and hacked into it to try to make it work for me (see my notes below if you're interested in the details).
I'm pretty happy with it now, though I'm still working out how to wear it - it's a bit chilly for winter to wear by itself, and the sleeve ties are too bulky to cover with a jacket or jumper, so I may have to wait for warmer weather to comfortably wear it. The cardigan is comfy but not quick to get on and off when necessary. Anyway... all up a reasonably wearable dress, but yet another reminder for me to listen to my intuition when it's telling me something won't suit me... but it's all experience, I guess :-)
A few pattern alteration/sewing notes:
• The neckline. It looked great on everyone in the Flickr group, I'm sure it's designed well, the construction was fine, but I just hated it. I felt like I'd just stepped off a factory production line. Not that there's anything at all wrong with that of course, but uniform wasn't the look I was going for. So I went back to the elastic as in the previous versions I've made. I wish I'd taken a photo before I hacked the yolk off, then you could have told me if it was all in my imagination or not!
• The zip. I was going to keep it in the back, had figured out how to simultaneously have the zip and elastic but in the end didn't need it so took it out. I thought the balance would be out if I made the bodice area so fitted that I needed a zip to get into it. So it's a pull over the head. With a bit of wiggling.
• The sleeve ties. Still love them. Thought there was a big chance of them annoying me, but after wearing for a day I find they don't.
• The fabric. Has been lovely to wear. It's a medium weight linen, and the colour is that sort of blue that goes purplish when you iron it. Hopefully it won't fade too quickly. As I love the fabric so much I thought I'd better try to do it justice and do french seams. My scruffy white overlocking would not do it justice.
• Darts. I added some darts to the front to add some shape and it worked well, I'd definitely do that again. I know I've spoken before about feeling 'swamped' by loose shapes.
• Pockets. Not sure whether to add them, and if so, what type? Definitely not the production line version supplied with the pattern (sorry designer). Should I trim them in the red fabric? Put them in the side seams? Leave them out altogether? What do you think - pockets or no pockets?
* I've been asked by several people for advice on where to purchase the pattern as it's out of print. I think the best bet is to keep checking Etsy and Ebay, particularly from those shops that sell other Built by Wendy patterns. I bought mine from Etsy, shipped from the US. It's a shame that they're out of print as they're so popular, but I guess the pattern company has it's reasons!
Monday, June 27, 2011
Kids messenger bag
Thank you for all your lovely comments over the weekend on my blogiversary, it's really nice to 'meet' some more of you who read my blog. People sometimes say to me that they feel shy about leaving comments for one reason or another, but I'd always encourage you to - even just to say 'hi', all of your comments are always so appreciated.
Today I thought I'd show you a kids messenger bag made for a sweet little friend recently (and this is one of the items in my giveaway). I love making these bags, and all bags really, but these especially.
I think this is about the 6th I've made. Before our holiday last year I made up a pattern based on what I thought would be useful and went from there, making one each for the girls. It was fun, in a nerdy sewing kinda way, to work out how to sandwich all of the layers together and make it work.
They tend to take one evening to make (unless something goes wrong!) and are pretty straightforward. I fully line them to give some strength and durability, add velcro for the closure and sometimes a little pocket inside. I've thought about adding extra details (adjustable strap, snap closure etc) but I think for little hands the simplicity of this design is better.
I enjoyed seeing the girls use them their bags on holiday and then over and over again. So now I sometimes make them as gifts, like this one.
Next up I must make my boy one. He keeps stealing the girls' bags and wearing them around the house, so I'll take that as a hint ;-). Though I may have to wait til my fabric buying freeze is over as there's not much in the way of boy-ish fabric in there!
I should really make myself a new bag too - the nappy bags I made almost 2 years ago for my boy's birth are looking extremely tatty now. Ah, so many bags, so little time!
* The fabric I've used on the outside is my falling-off-the-stash-bustin'-wagon fabric, so I daren't add it to my Stash bustin' tally over there on the right (hee hee). But hey, at least the inside was stash ;-)
Friday, June 24, 2011
Blogiversary giveaway
It was my 'blogiversary' recently (well, last month, but who's counting!). I wanted to thank you all for your comments, kind words and encouragement over the past year. I love my little space here and you make it so much more fun and rewarding.
1. kids messenger bag 2. felt heart garland 3. kids initial cushion
To celebrate the year and thank you for joining me I thought I'd do a giveaway and tailor it to what you would like. And you'll also be helping me to stash bust!
4. fabric belt 5. zip purse 6. baby slippers
- - - - - You can choose your favourite 3 items from the pictures here. They might be things you'd like for your littlies, a gift for a friend, or just for you... Once I have a winner I will make your items using fabric from my stash. You can either have them made in the same fabric as in the picture (providing I happen to still have some), or tell me some of your favourite colours and I'll choose the fabrics to coordinate, or leave it up to me to choose - - - - -
There will also be a 2nd prize mystery giveaway!
7. pocket tissue holder 8. wrist cuff 9. jersey scarf
To enter: Leave me a comment listing your 3 favourite items from the pictures. Remember to add your email address if I can't access it from your comment.
10. Toddler cap (size up to about 4 years) 11. book bag 12. kids wrist cuff
I'll leave the giveaway open until next Friday (1st July), when I'll get one of my littlies to choose a number from a hat and announce it. Then I'll get making your goodies and post them to you.
Good luck and thanks again :-)
1. kids messenger bag 2. felt heart garland 3. kids initial cushion
To celebrate the year and thank you for joining me I thought I'd do a giveaway and tailor it to what you would like. And you'll also be helping me to stash bust!
4. fabric belt 5. zip purse 6. baby slippers
- - - - - You can choose your favourite 3 items from the pictures here. They might be things you'd like for your littlies, a gift for a friend, or just for you... Once I have a winner I will make your items using fabric from my stash. You can either have them made in the same fabric as in the picture (providing I happen to still have some), or tell me some of your favourite colours and I'll choose the fabrics to coordinate, or leave it up to me to choose - - - - -
There will also be a 2nd prize mystery giveaway!
7. pocket tissue holder 8. wrist cuff 9. jersey scarf
To enter: Leave me a comment listing your 3 favourite items from the pictures. Remember to add your email address if I can't access it from your comment.
10. Toddler cap (size up to about 4 years) 11. book bag 12. kids wrist cuff
I'll leave the giveaway open until next Friday (1st July), when I'll get one of my littlies to choose a number from a hat and announce it. Then I'll get making your goodies and post them to you.
Good luck and thanks again :-)
Thursday, June 23, 2011
My creative space: dyeing
I have blue fingers again today - only slightly from the cold, mostly from the dye that I have been playing around with again today.
I've been getting hugely inspired by all the blog posts on dyeing I've seen lately. I came across the Make Something blog recently. Have you seen it? Karyn sews the most amazing things (check out her '13 dressses' - I want one of each!). She writes about natural dyeing and 'Shibori'. Inspiring stuff. Karyn also owns and runs a sewing shop where she teaches sewing (and sells sewing related stuff I think) and hires out sewing machines by the hour - how cool is that!! I just want to be Karyn ;-)
OK, off to be me... see you tomorrow for my blogiversary giveaway!! Yay, I've finally got it together (well, almost).
* I'll explain more later about the dresses I'm dyeing and my plans for them - lots of experiments going on.
More creative spaces to be seen here.
Wednesday, June 22, 2011
Stash guilt dress
To quell some of my guilt about recently adding to my stash I made this dress for my little girl the other night. I knew the fabric would make a fabulous dress - all cotton, good drape, hard wearing and with a cute animal print (including some Australian animals!).
And luckily my girl thinks it's good too. She wouldn't let me take a shot of it without her in. And as soon as I'd finished she put it on - for the 2nd day in a row!
I cut a pattern from a dress she already has that fits well. It is a simple 2 sided sleeveless dress with buttons (don't know what this style is called?). It has a facing on the back and front and that's it. Pretty simple but effective. I did consider putting pockets on it but at midnight I decided to declare it a day and be happy with what I had rather than turn it into a more complex project.
She's wearing it with long sleeved t-shirts and leggings in the cooler weather, and if it still fits in warmer weather I think she could wear it alone.
So, quick and easy for me, a hit with the little girl... maybe the stash busting lapse was not such a bad thing afterall ;-) Hope you're having a good Tuesday.
Monday, June 20, 2011
Falling off the wagon
Oh dear. It's a mere 4 weeks since I posted about stash-busting and yesterday I fell off the wagon by purchasing some fabric. I didn't go out to buy fabric, I wasn't even in a fabric shop, but somehow I found some and couldn't say no. Does anyone know if there's a fabric equivalent to AA? Coz if there is, I need it!!
From the moment my friend and I walked into the Corban & Blair sale yesterday and I saw this gorgeous piece of animal print fabric, I knew it was coming home with me. No questions, no justifications, I was just not putting it down. Tragic.
$5, 2 x 2 metres, great print, good quality fabric. It's too late to start trying to justify my fall from grace. It's done, washed and ideas are forming in my head as to what I can make with it. Definitely a kids messenger bag or two.
I also got a lovely birdy brooch to add to my little collection ($2).
And this great roll of numerous sheets of printed paper (another $2).
Oh well, I'm human. I'm going to try to make it up to myself by using the fabric quite quickly (mm hmm) and also making a doona cover for the girls' bedroom out of the stash - that should reduce the bulk a bit ;-) And next time I'm tempted I'll try to stop myself!
- - - - - - - -
By the way, I've hatched an idea for a giveaway to celebrate my recent blogiversary, I just need to get the pics together. I'm hoping to do a post on it tomorrow or Wednesday - hope you are going to like it.
Thursday, June 16, 2011
Little boy belt
I had a problem with my little boy. As cute as his little chubby bottom is, I was sick of seeing half of it hanging out of his pants each day. 'Builder's crack' is not as bad on an almost 2 year old as it is on a man, but never-the-less, it had to go. The weather is cold out, people laugh, he was losing his dignity ;-) And I was sick of people constantly telling me "his pants are falling down!". It's hard keep your playground cool with half your bottom exposed!
After looking unsuccessfully for a suitable belt at my favourite kids boutique I suddenly realised I had to make one. Of course looking at a big chain store would be too sensible! Anyway, I thought I'd seen a tutorial on the fabulous Elsie Marley blog and lo, there it was, exactly what I wanted.
I used a scrap of khaki upcycled canvas, a metal ring thing that I'd cut off something previously (I keep all those bits when I'm discarding something) and some snap fasteners. So I got to make something and try out a new gadget, the snap fastener. After a bit of trial and error (more hammer bashing needed) I got the hang of it and loved doing them.
Then I finished off the belt with a tiny bit of decoration in the form of some hand stitching with a thick yellow linen thread. I had bought this recently after a salesperson had told me it was for use in a sewing machine, but then got it home, opened the packet and found printed on the packaging DO NOT USE IN SEWING MACHINE. Damn. I was tempted to try it anyway as I thought it would look make great top stitching but didn't want to risk breaking my old sewing machine. So a little hand stitching it was.
In my head I had pictured a cute photo of the boy toddling along with his cheeky grin, belt on display, but that didn't happen... so here at least is proof of the now covered up bottom.
Have a lovely weekend!
My creative space: pop tarts
Creativity of the cooking kind today....
Whilst trying to think of a filler for lunch boxes last night I remembered this great post from Smitten Kitchen on pop tarts. I don't actually know if we have pop tarts in Australia, and I've never tried one. But the kids have been getting quite addicted to some store bought pastry-ish fruity snack bars, so I thought I would try to make a homemade version. Not that I'm against store bought snacks (I'm currently addicted to salt & vinegar flavoured rice cakes - much like eating a salty piece of styrofoam), but I don't want us to get too reliant on them. And it's nice to know what's in your food.
So I took tips from Smitten Kitchen, including her jam filling suggestion (thicken with cornflour) but used a standard sweet shortcrust pastry recipe (as hers had egg in and that would have excluded my allergic girl from the fun).
As a snack I liked these and will probably make them again, maybe trying the brown sugar & cinnamon filling next time. Do you have a current favourite snack?
More creative spaces over here.
Tuesday, June 14, 2011
Weekend craftiness: part 2
OK, I'll admit it - this one is a mummy craft, something I've been wanting to try ;-)
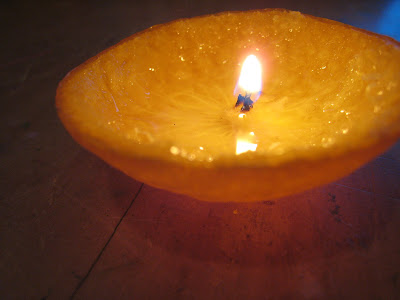
I first spied this tutorial for mandarin lantern at the Lucy Patterson Hands-on blog a while ago and fell in love with it. But of course we had to wait for mandarin season, and you also need those lovely specimens with the thick but slightly detached from the flesh skins, if you know what I mean!
So you basically carefully cut around the middle of the mandarin, and gently remove the skin from the flesh, leaving two pieces. Then cut a hole in the top section (to act as a chimney).
Using what's left of the 'stalk' of white pith attached to the base, squeeze and trim it to act as a wick, put some vegetable oil in the base, light it and place the top section on.
It took us a couple of goes to firstly get the flesh away from the skin without breaking it, and then to get the 'wick' the right size/shape to burn, but it was lots of (nerdy) fun and great when it worked. We lit up our mantle in the lounge room with the beautiful orange glow.
Do check out Lucy Patterson's tutorial, she say it all much more eloquently than I do, has full instructions, lots of pretty pictures and a mandarin-eating dog :-)
Now I just wish we had mandarins available at halloween and Christmas... but we'll have to leave that up to you Northern Hemisphere dwellers out there!
Monday, June 13, 2011
Weekend craftiness: part 1
We've had a long weekend here with lots of rain, perfect for a couple of craft projects...
I've noticed lately some groovy machine stitched brooches around made from several layers of fabrics and have been looking forward to making one myself. So I thought it might be a nice project to do with the kids. They seem to like playing around with bits of fabric (wonder where they get that from!) and I always find it interesting to see what they put together without the preconceived notions of what works and what doesn't that we adults have.
My big girl decided to make a flower shape. She chose denim as the base and I machine sewed it to the circle beneath. She then hand stitched a couple of circles and a button on. I used the hot glue gun to stick on the small spots she'd chosen to sit on each of the petals.
I then stitched a safety pin onto the back and it was done.
She quickly had an idea for another brooch... She traced a circle onto felt, cut it out and asked me to stitch it onto a backing fabric. I had fun doing this little spiral...
And she then started sewing on a selection of buttons that she'd taken time choosing from my button stash.
Then we finished it off with a backing piece of felt to hide all the stitching and a safety pin.
It was great seeing her sense of achievement and her unique design ideas.
Yep, I think she's getting indoctrinated into the crafty life!
Thank you for all of your kind words and support about my mother guilt and anxiety in my last post - it helps to hear I'm not alone
Thursday, June 9, 2011
My creative space: noticeboard
Just a quickie today so I can go and finish the project pictured below, a noticeboard for my big girl to hang in her bedroom and use. There's a healthy amount of mother guilt going on behind this... my grumpiness made her cry at school drop off this morning :-( Oh dear, must try harder. Hope you are having a less grumpy day/week.
Pop on over here to see more creative spaces.
Wednesday, June 8, 2011
Mittens for my kittens
My big girl came home from school yesterday complaining of cold hands and I suddenly had a flash-back to my school days when we were stuck outside during breaks, the cold winds blowing onto cold little bodies.
I knew that sewing her some gloves would be beyond me, at least in the short term. They'd need too much testing, too many prototypes, and she'd be asleep when I made them, unable to be my model. So mittens it was.
Before she went to bed I traced her hand for size, then searched for a few tutorials online, settling on one with separate thumb pieces. Having no polar fleece that came even close to the school blue I just went with some bright and warm-looking colours and chose red for the tops and magenta for the underside pieces. Once I got my head around the construction of the thumb pieces the first pair was quick and easy but... way way too small!
I then upsized the pieces and they looked better. I figured I could say the little ones are for her little sister, who would have been outraged if she'd been left out, even though she doesn't have to hang around in a cold school playground. They were too small even for her though! Anyway, she was pleased to have some of her own, too small or not ;-)
I finished then off with some ribbing to stop the cold air going up and that's it. No seam finishings or embellishments, but ready for school this morning. Motherly anxiety eased!
* All fabrics from the stash, so another for the stash bustin' tally, yay!
OK, you can take a photo mum, if you must!
Subscribe to:
Posts (Atom)